 |
| Boing! Boing! Springs for feet! |
I really like these because they're cheap, quick and hands free while your dog is jumping. Your dog can also jump through it in a series if you have more than one jump, you can add it into a larger course or use it as an obstacle in training.
First you need to know what height to make your jump. For that, you need to measure your dog and find its jump class. Dogs are measured at the withers, that is, the highest point where the neck meets the back down to the floor. From there you can generally determine a jump height. The charts for different clubs and their jump heights can be found here (you can also order equipment on this site too, if you're so inclined). Max is 15 1/2" at the withers so the highest he will jump is a 16" bar, which is what I made.
Now that you've found your jump height let's get started! You will need 3/4 inch schedule 40 pvc pipe and slip fittings, how much depends on your jump height and a few other variables. Small dogs could probably get away with 1/2 inch pipe. Generally you can find pvc in the plumbing department. If you don't find it, don't hesitate to ask and ignore the "not it's intended use" statements employees sometimes prattle off. You'll also need a hack saw or electric saw, we used a miter saw, tape measure, permanent marker and pvc glue if you want it. *As always, if you're working with tools or glues please take appropriate safety measures.*
Here we go!
I haven't included standard measurements for each piece since every dog height is a bit different so you can make yours to scale. I have included the approximate measurements in parenthesis for the pieces I use, just adjust accordingly. Also know that your slip joints will eat 1/2 of an inch off any pipe pieces you use.
There are regulation measurements on the web pages for various dog clubs but I'm doing this for fun so I don't worry about it too much.
First, a materials/cut list:
 |
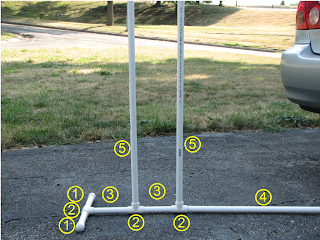
| Pieces are numbered by order, not quantity |
2. 6 "t"-connectors, also known as joints with side outlet. For 3/4" pvc, each of these uses 2 3/4" of height. Make sure you get slip fittings instead of threaded and all the joints are 3/4".
3. 4 leg risers of varying lengths to get your jump heights (6")
4. 2 top guide bars with caps (24")
5. 2 horizontal jump bars (34") (one is for added stability)
Measure your pvc and use your permanent marker to decide where to cut. With your saw, cut the pvc to appropriate lengths. If you're using a hack saw, a miter box comes in handy at this stage. Place caps on the ends of the feet pieces as well as the top guide bars.
Let's assemble!
First, grab two feet pieces (#1) and join them with one t-connector (#2) so they form a line, leaving the perpendicular outlet side open. Do this twice so you have two sets of feet.
Second, add one leg riser (#3), one t-connector (#2) and the other leg riser (#3) perpendicular to the foot using the outlet hole. Add another t-connector (#2) and the top guide bar with cap (#4). Make sure the t-connectors are perpendicular to the foot and the outlet holes face up when the form is laying down (see pic). This forms the upright posts. Do two sets of these.
Third, add horizontal guide jump bars to one side of the upright post using the outlet holes.
Lastly, Attach the other upright post to the horizontal bars Stand upright and measure to make sure you've got your jump height from the top of the highest horizontal bar.
If you want Jump cradles like you'd see in official jumps go see my post on modifying the top t-connector to a cradle.
Enjoy your lightweight, easy to handle and build jump with your dog!


Great "how to"! I would suggest also cutting the T connectors so that the jumping pole is actually sitting in a cradle (instead of being inserted into an opening). If the dog knocks the jump pole (cross bar) when going over, only that pole will fall, making it less scary for the pooch. And safer for him too! Max looks like he's having a ball!
ReplyDeleteGood call Peggy! You beat me to the next tutorial! I have done this using my multi-tool and it worked really well.
ReplyDeleteI am glad you are doing a tute on it, Ashley - I know my clumsy description will leave some (alot of) people scratching their heads saying "whaaa???" : )- Looking forward to it - thanks for a fun blog!
ReplyDeleteBAD IDEA --BAD Plan -- you need to get "jump cups" to rest the cross bar on, so when the dog "knocks" it, the bar will come off, and not the entire apparatus . they are easy to find; search "jump cup , dog and agility" on eBay or amazon or anywhere.
ReplyDeleteGo ahead and read a few posts down about jump cradles.
Delete